Programming Experiments with oTree
Setting Up the Environment
Quick start: Environment Setup
Mac/Linux:
- Install Python
# Mac with Homebrew
        brew install python3

        # Ubuntu/Debian
        sudo apt install python3 python3-pip
- Create and activate virtual environment
Option 1: venv
python3 -m venv otree_env
        source otree_env/bin/activate
Option 2: conda
# Download & install Miniconda from:
        # https://docs.conda.io/en/latest/miniconda.html

        conda create -n otree_env python=3.10
        conda activate otree_env
- Install oTree
pip install otree
Windows:
-
Install Python
- Download from python.org
- Check "Add Python to PATH"
- Open PowerShell/CMD as admin
-
Create and activate virtual environment
Option 1: venv
python -m venv otree_env
        .\otree_env\Scripts\activate
Option 2: conda
# Download & install Miniconda from:
        # https://docs.conda.io/en/latest/miniconda.html

        conda create -n otree_env python=3.10
        conda activate otree_env
- Install oTree
pip install otree
Quick start: Project Setup
- Create new project
otree startproject guessing_game
        cd guessing_game
        otree startapp guessing_app
- Run development server
otree devserver
Database Configuration
- By devserver: SQLite
- Created automatically
- Runs on same server as app
- On Heroku: PostgreSQL
- Runs on separate server
- More reliable, scalable
- Requires additional setup
Detailed Structure and Workflow in oTree
Main building blocks of any game
- Data input/collection
- Data processing:
- calculation of payoffs and other properties based on input
- Interaction of data across players (not in all games)
- More data collection
- Showing the results and other info
- (Repeat - for multi-round games)
Typical Game Blueprint
| Blueprint | Guess Game |
|---|---|
| 1. How many players? | 1 player |
| 2. Real-time interaction? | No interaction |
| 3. Number of rounds? | 1 round (or more) |
| 4. Different roles? | No roles |
| 5. Main stages? | Generating random number, letting player guess, show results |
| 6. When are payoffs calculated? | After the guess is made |
| 7. Info needed from other players? | No info needed |
| 8. External information needed? | Pre-generated random number |
| 9. Treatment variations? | No treatments |
Guessing Game: Configuration (settings.py)
SESSION_CONFIGS = [
        dict(
            name='guessing_game',
            app_sequence=['guessing_app'],
            num_demo_participants=1,
        ),
        ]
File location:
otree_workshop/
        └── guessing_game/
        ├── _static/
        ├── _templates/
        ├── guessing_app/
        │   ├── __init__.py
        │   ├── Instructions.html
        │   ├── MyPage.html
        │   └── Results.html
        └── settings.py ⭐
Data processing: first intro
-
Models: where the data is stored
- Player
- Group
- Subsession models
-
Field types
-
Field properties: (doc, verbose_name, max/min, choices, and other field properties)
Guessing Game: Constants
class C(BaseConstants):
        NAME_IN_URL = 'guessing_app'
        PLAYERS_PER_GROUP = None
        NUM_ROUNDS = 2
        ENDOWMENT = cu(100)
        MIN_NUMBER = 0
        MAX_NUMBER = 90
File location:
otree_workshop/
        └── guessing_game/
        ├── _static/
        ├── _templates/
        ├── guessing_app/
        │   ├── __init__.py ⭐
        │   ├── Instructions.html
        │   ├── MyPage.html
        │   └── Results.html
        └── settings.py
Guessing Game: Player Model
class Player(BasePlayer):
        computer_number = models.IntegerField()
        guess = models.IntegerField(
            min=C.MIN_NUMBER,
            max=C.MAX_NUMBER,
            label="Please, insert any number from {} to {}"
        )
File location:
otree_workshop/
        └── guessing_game/
        ├── _static/
        ├── _templates/
        ├── guessing_app/
        │   ├── __init__.py ⭐
        │   ├── Instructions.html
        │   ├── MyPage.html
        │   └── Results.html
        └── settings.py
Anatomy of an oTree Page
-
Page creation:
- class definition
- template
-
When/if/for whom it is
- position in page_sequence
- method
is_displayed -
What is shown:
vars_for_template -
What to do next:
before_next_page()
Page Creation Basics
class NameOfThePage(Page):
        pass
page_sequence = [NameOfThePage]
- Create Template
- Template name must match page class name
- Example:
NameOfThePage.html - Located in same folder as
__init__.py
File location:
otree_workshop/
        └── guessing_game/
        ├── _static/
        ├── _templates/
        ├── guessing_app/
        │   ├── __init__.py        ⭐
        ├── ├── Instructions.html
        │   ├── NameOfThePage.html ⭐
        │   └── Results.html
        └── settings.py
Guessing Game: Page Flow
class Instructions(Page):
        @staticmethod
        def before_next_page(player, timeout_happened):
            player.computer_number = random.randint(
                C.MIN_NUMBER, C.MAX_NUMBER
            )

        class MyPage(Page):
        form_model = 'player'
        form_fields = ['guess']

        @staticmethod
        def before_next_page(player, timeout_happened):
            difference = abs(player.computer_number - player.guess)
            player.payoff = C.ENDOWMENT - difference

        class Results(Page):
        @staticmethod
        def vars_for_template(player):
            guess = player.field_maybe_none('guess')
            difference = abs(player.computer_number - guess) if guess is not None else 0
            return {
                'difference': difference
            }
Page sequence:
page_sequence = [Instructions, MyPage, Results]
Templates: Using Variables
- From
vars_for_template:
@staticmethod
        def vars_for_template(player):
        return {
            'my_var': 42,
            'my_list': [1, 2, 3],
            'my_dict': {'key': 'value'}
        }
<p>Variable: </p>
        <p>List item: </p>
        <p>Dict value: </p>
- Built-in model variables:
<!-- Constants -->
        <p>Endowment: </p>

        <!-- Player variables -->
        <p>Payoff: </p>
        <p>ID in group: </p>

        <!-- Group variables -->
        <p>Group ID: </p>

        <!-- Subsession variables -->
        <p>Round number: </p>
Templates: Including Files & Special Tags
- Including other templates:
<!-- Include entire file -->


        <!-- Include specific blocks -->
- Special oTree tags:
<!-- Submission buttons -->

        <button>
        Clicking this will submit the form
        </button>

        <button type="button">
        Clicking this will not submit the form
        </button>

        <!-- Form elements -->


        <!-- Blocks -->

        Page Title
Guessing Game: Templates
Instructions.html:
        Instructions


        <div class="card">
            <div class="card-body">
                <p>You have an endowment of .</p>
                <p>The computer will generate a number from
                    to  .</p>
                <p>You have to guess this number.</p>
                <p>The closer is your guess the more you will earn.</p>
            </div>
        </div>
MyPage.html (Decision Page):
        Make your guess


        <div class="card">
            <div class="card-body">
                <p>You have an endowment of .</p>
                <p>The computer will generate a number
                    from  to .</p>
                <p>You have to guess this number.</p>
                <p>The closer is your guess the more you will earn.</p>
            </div>
        </div>
Results.html:
        Results


        <div class="card">
            <div class="card-body">
                <p>The number that computer generated was:
                    </p>
                <p>Your guess was: </p>
                <p>The difference is: </p>
                <p>Your final earning is:
                     -  points =  </p>
            </div>
        </div>
Hosting and Resources for oTree
Git
- Initialize repository
git init
- Stage & commit changes
git add .                        # Stage all files
        git commit -m "Commit message"   # Save changes
- Connect to remote
git remote add origin <REPO_URL>
        git push origin master
- Undo & sync
# Rolling back
        git checkout <COMMIT_ID>    # Return to specific commit
        git stash                   # Temporarily store changes

        # Get updates
        git pull origin master      # Download & merge changes
Deploying opportunities
1. Heroku/Cloud Services (up to 500)
- Many tools for deployment and management
- Free tier discontinued
- Multiple concurrent sessions
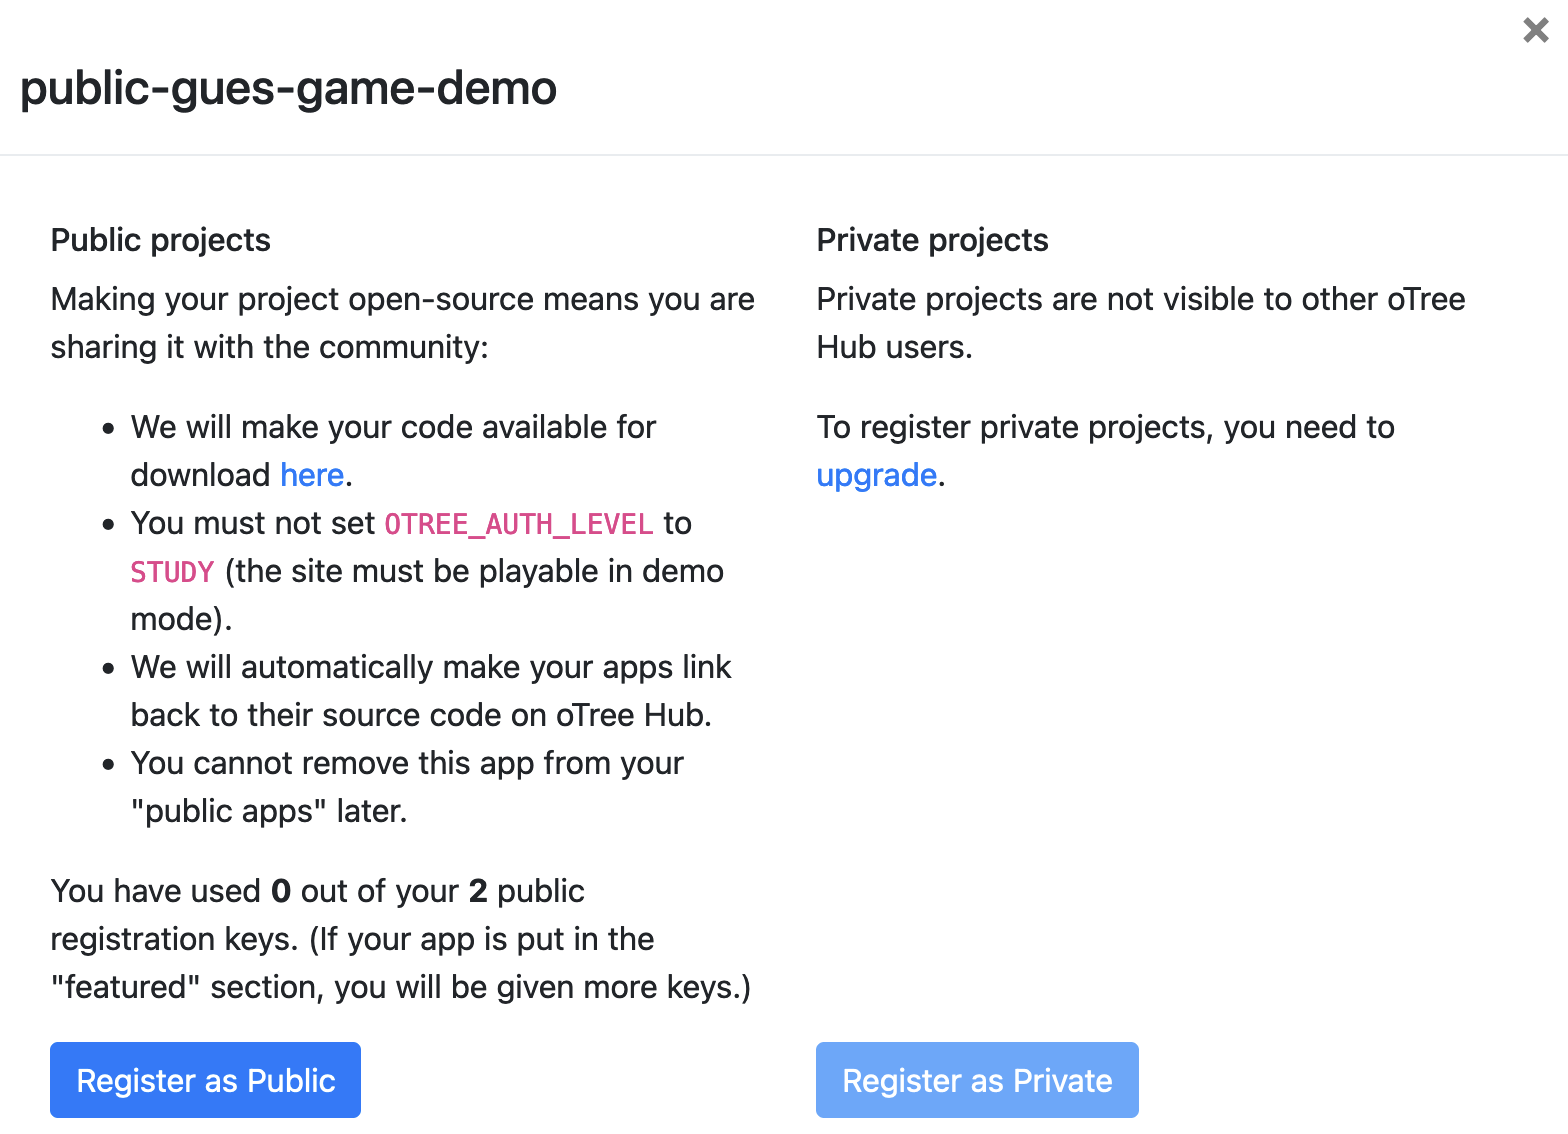
2. oTree Hub (10-50)
- Free tier: 2 sites (addons not free)
- Make your code publically available
- Requires Heroku account
- Good for beginners
- Limited but sufficient for most
3. Local + ngrok (10-30)
- Streaming from your laptop
- Limited by your hardware
- Limited by connection and soft
- need to setup ngrok
4. Own Server (Advanced) (40-200)
- Requires server management skills
- Need static IP
- More setup work
- Need task manager and dependencies within env
Local Deployment with ngrok
1. Setup ngrok
- Register at ngrok.com
- Get your authtoken from Dashboard
- Install pyngrok:
pip install pyngrok
2. Configure Environment
# Set environment variables within environment
        OTREE_AUTH_LEVEL=STUDY
        OTREE_ADMIN_PASSWORD=mypassword
        DATABASE_URL=postgresql://...
3. Start oTree Server
# Start production server
        otree prodserver 8000
4. Install pyngrok
# In activated environment
        pip install pyngrok
5. Create Tunnel
# In Jupyter via VS Code or
        # via terminal run python commands
        from pyngrok import ngrok

        # Set your authtoken
        ngrok.set_auth_token("your_token_here")

        # Create tunnel
        public_url = ngrok.connect(8000)
        print(f"Public URL: {public_url}")
💡 Tips:
- Use same Python environment as oTree
- Keep Jupyter/VS Code running
- URL changes each session
ngrok Setup: Token & Tunnel
1. Get Authtoken:
- Go to ngrok Dashboard → "Your Authtoken"
- Copy token for your configuration
- Keep it secure!
2. Run Server & Tunnel:
- Share generated URL with participants
- Don't forget to disconnect tunnel after session
ngrok.disconnect(public_url)

Deploying via oTree Hub (plus heroku)
1. Local Preparation
# Inside your project directory
        cd my_otree_app

        # Create deployment package
        otree zip
        # Creates: my_otree_app.otreezip
2. Heroku Setup
- Register on heroku.com
- Register on heroku Developer Program
- Add payment method (required)
- Create new app:
- Go to Dashboard
- Click "Create new app"
- Choose app name
- Select region
3. oTree Hub Connection
- Go to oTree Hub
- Navigate to "Heroku server deployment"
- Click "Connect oTree Hub to Heroku"
- Find your app in the list
- Click "Register"
💡 Tip: Free tier includes 2 Heroku sites
oTree Hub: public (code available to everyone!)
oTree Hub: Upload .otreezip file

oTree Hub: Configuration & Pricing
Recommended Setups:
-
Development & Testing
- Eco Dynos ($5/month)
- Suitable for development
- Good for small test sessions
- Covered by Student Program
-
Load Testing Setup
- Basic Dynos ($5/month)
- PostgreSQL Mini ($5/month)
- Total: $10/month
- Covered by Student Program ($13/month)
Why Use oTree Hub? ↗
- Proper server configuration
- Performance monitoring
- Easier deployment process
- Reduced risk of data loss
- Better error handling
💡 Resources:
- Student Developer Program ($13/month credit)
- Deployment Tutorial (older but useful)
Deploying to Heroku
- Prerequisites:
# Sign up for Heroku
        # Install Heroku CLI
        # Initialize Git repository (see previous slide)
- Create & deploy:
# Create new Heroku app
        heroku create <APPNAME>

        # Deploy code
        git push heroku master

        # Reset database
        heroku run otree resetdb
- Additional setup:
# Set config(environment variables, databaseurl, etc)
        heroku config:set OTREE_PRODUCTION=1
        heroku config:set OTREE_AUTH_LEVEL=DEMO

        # Check logs if needed
        heroku logs --tail
Deploying to Heroku 2
-
If needed: Add PostgreSQL:
Open Heroku Dashboard → Go to your app → Click "Resources" tab → Under "Add-ons" search for "Heroku Postgres" → Select plan:
- Essential-0 ($5/month)
- Essential-1 ($9/month)
- …
Command line Database configuration:
# Add PostgreSQL addon (Essential-0 plan)
        heroku addons:create heroku-postgresql:essential-0

        # Check database URL
        heroku config:get DATABASE_URL
oTree Development Tools
oTree Studio
- Visual editor, no coding required
- Drag-and-drop interface
- Free tier oTree Hub deployment
Database Options for oTree 5
SQLite
- Built-in, no setup needed
- Good for:
- Development
- Small experiments (<40 users)
- Single server setups
- Limitations:
- Not for Heroku
- Poor with concurrent users
- Poor live_methods (parallel requests)
PostgreSQL
- Production-ready database
- Good for:
- Large experiments
- Multiple concurrent users
- Cloud deployment (Heroku)
- Features:
- Easy backups
- Remote access
- Better performance
Summary: Typical oTree Development Workflow
-
Plan & Design
- Write experiment blueprint
- Define participant flow
- Plan data collection
- Choose hosting solution
-
Setup Environment
- Install Python & oTree
- Configure IDE (PyCharm/VS Code)
- Create virtual environment
- Initialize Git repository
-
Development
- Create project structure
- Write models & constants
- Create pages & templates
- Add game logic
-
Local Testing
- Run
otree devserver - Test all participant flows
- Debug & fix issues
- Check data recording
- Run
-
Version Control
git add . git commit -m "Ready for deployment" git push origin main -
Deployment
- Deploy to Heroku
- Deploy to oTree Hub
- Deploy to ngrok
Platforms and Panels for Online Behavioral Research
- https://doi.org/10.3758/s13428-021-01694-3
- Platforms:
- Prolific
- M-Turk
- Toloka
- Limited acess (sona-systems)
Prolific Integration: Flow Overview
Prolific ─────────────> oTree (url) 1-t page ───────> oTree (redirect) last page
        ↑  ↑__________________________|__________________________|
        │                             │
        └ Experimenter (payoffs) ─————┘
Key Points:
- Prolific sends participant via URL with PID
- oTree runs experiment and stores data
- oTree redirects back to Prolific with completion code
- Experimenter downloads data and uploads bonuses
💡 URLs:
- url - To oTree:
`your-app.com/room/study?participant_label={PROLIFIC_PID}`
- redirect - To Prolific:
`app.prolific.co/submissions/complete?cc=CODE`
Prolific Integration: Prerequisites
Requirements:
-
Development:
- IDE setup (PyCharm/VS Code)
- Working oTree project
- Git repository
-
Deployment:
- Heroku account
- PostgreSQL addon
- HTTPS enabled
-
Integration:
- Prolific account
- Room configuration
- Completion codes
Sides:
-
Prolific:
- Participant recruitment
- Payment processing
- Study management
-
oTree:
- Experiment hosting
- Data collection
- Session management
-
Experimenter:
- Setup integration
- Monitor sessions
- Process payments
Prolific Integration: oTree Side
1. Room Configuration (settings.py):
- Create room for Prolific study
- Set display name
- Remove participant label file
2. Store Prolific ID (early app):
- Add prolific_id field to Player model
- Extract ID from participant.label
- Store after consent page
3. Configure Completion (settings.py):
- Add completionlink to session config
- Use placeholder until study creation
- Update with real code from Prolific
4. Setup Redirect (final app):
- Configure completion link in last page
- Add JavaScript redirect
- Test redirect flow
💡 Important:
- Test complete flow in development
- Verify ID storage
- Check completion redirect
- Validate data export
Guide with more details: Running oTree on Prolific for Beginners
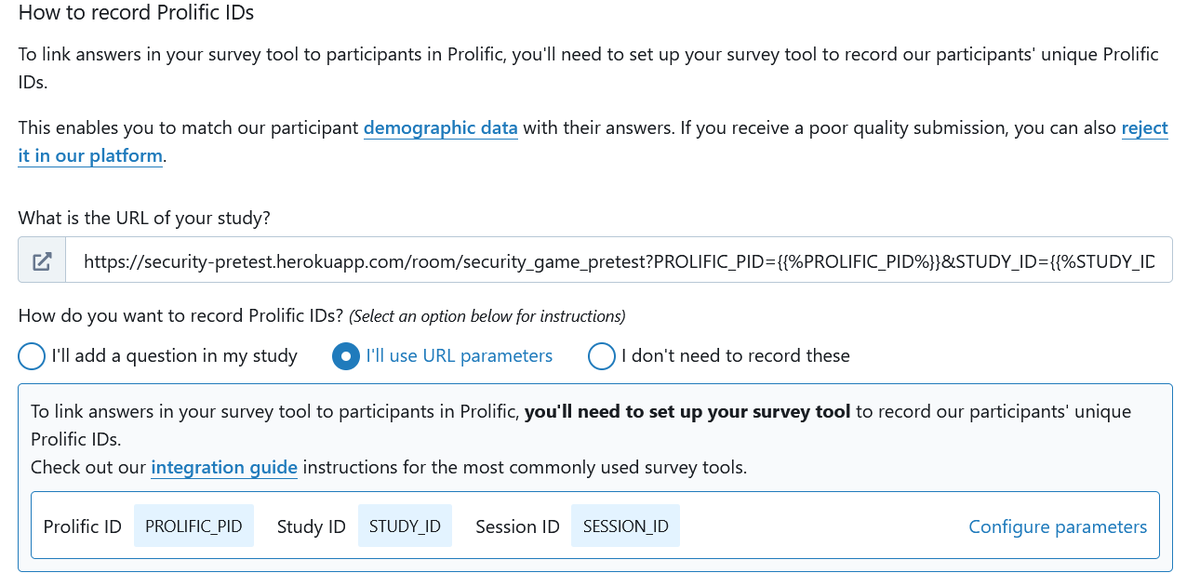
Prolific Integration: Prolific Side
1. Configure Study URL:
- Go to "Study Settings"
- Find "How to record Prolific IDs"
- Paste your Heroku room URL
- Select "URL parameters" option
2. Set URL Parameters:
- Keep
participant_labelas parameter - Full URL format:
your-app.com/room/study?participant_label={PROLIFIC_PID%}
3. Completion Setup:
- Get completion code from Prolific
- Update your oTree config:
completionlink=
        'https://app.prolific.co/submissions/complete?cc=XXXX'
💡 Important:
- Test URL in Preview mode
- Verify ID recording
- Check completion redirect
- Monitor submissions
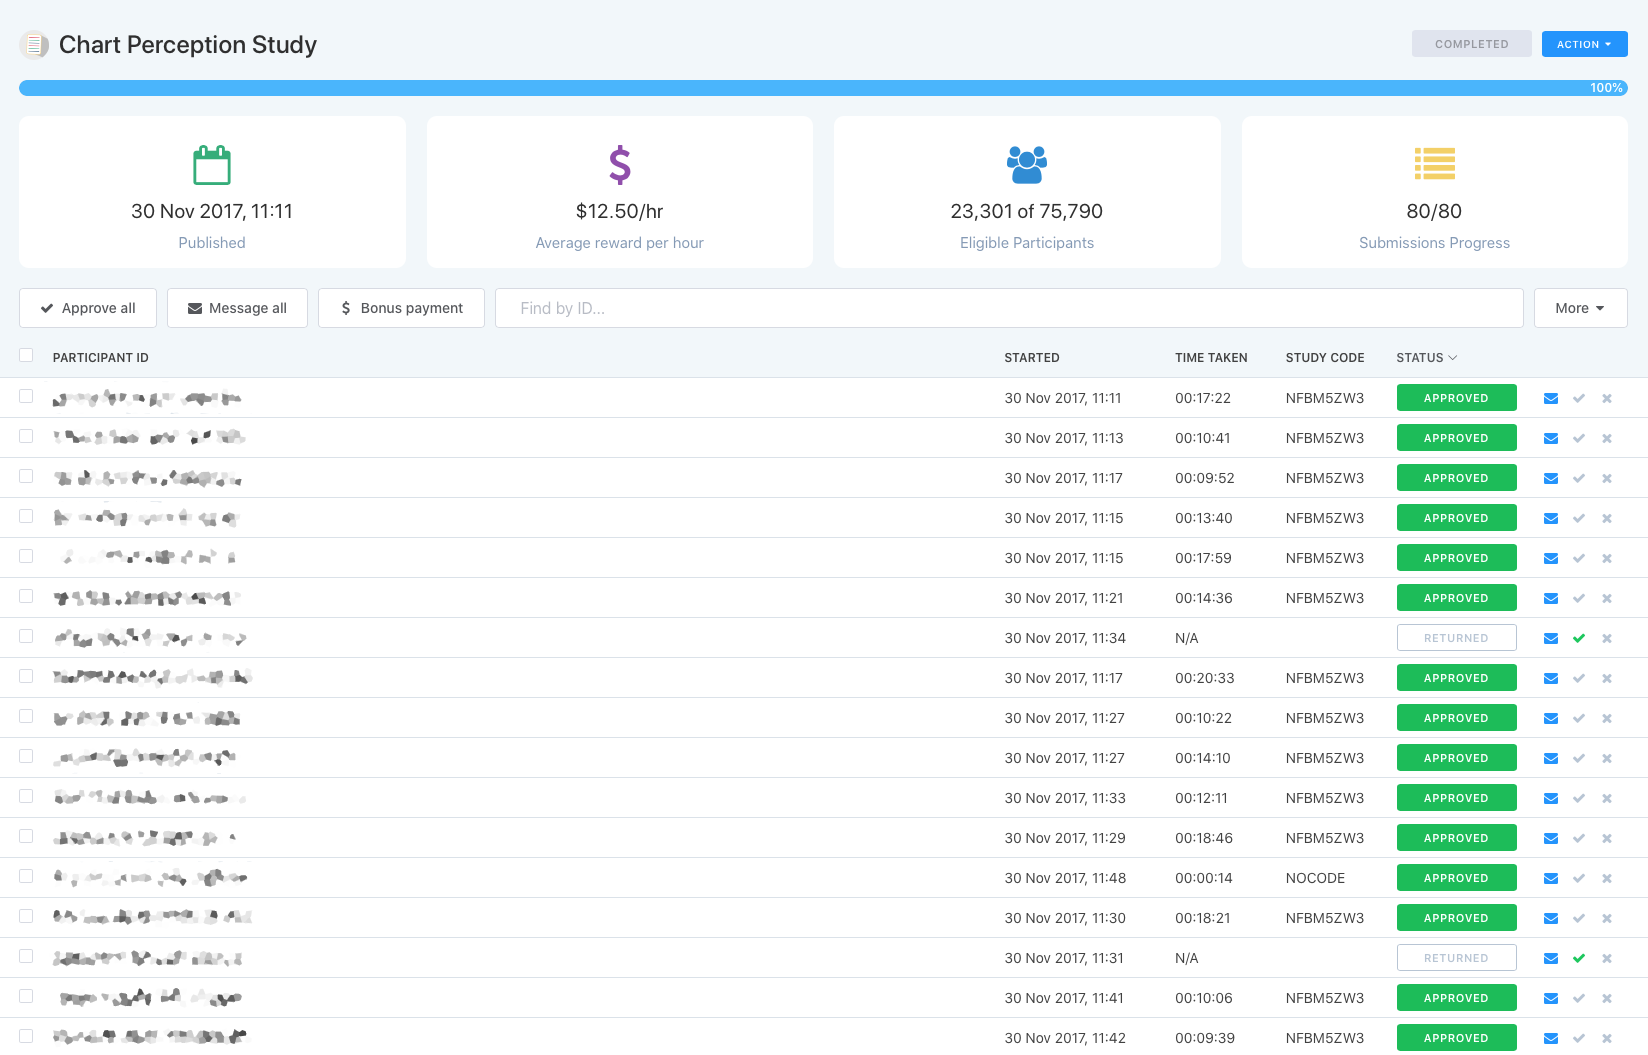
Prolific Integration: Experimenter Side
1. Data Verification:
- Check completion status
- Verify stored Prolific IDs
- Review recorded bonuses
- Export data from oTree
2. Payment Processing:
- Return to Prolific study page
- Options for bonus payments:
- Manual approval
- Bulk actions for large studies
3. Important Notes:
- Prolific charges processing fee
- Base payment for participation
- Bonuses are additional
- Monitor dropout rates
💡 Resources: